

Guide for using the Stencil buffer in Unity to create portals & windows when using the Universal Render Pipeline. This info is also suitable applicable to the Lightweight Render Pipeline (LWRP)
Update 2/11/2020: Added notes for Culling shadows from hidden objects
In this example/ tutorial I'm working on a 2.5D platformer that has a section of moving tiles. I only want the inner section of the tiles to move, and I don't want the edge of the moving tile to be visible past the edge of the static platform, a bit like a conveyor belt. There are a few different ways to get an effect like this, such as using a render texture for example but in this tutorial I'm going to use the Stencil overrides feature in the Universal Renderer Pipeline to accomplish this.
The Finished conveyor belt effect
GameObjects Setup
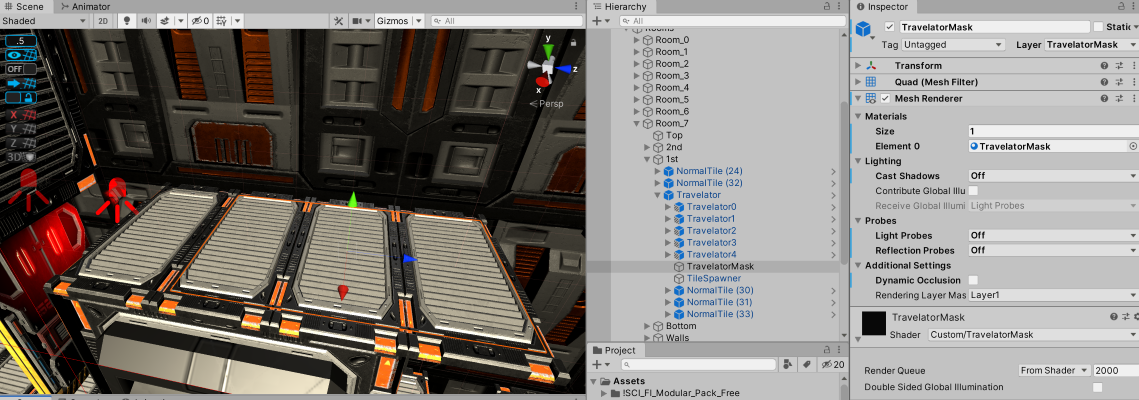
I've created 5 tiles that move - when a tile reaches the end of the travelator, it is moved back to the start. These tiles are on a separate layer called TravelatorTiles
Moving Travelator tiles
The next step is to create a mesh that will only show objects on the TravelatorTiles layer when they are occluded by (hidden behind) it. To do this, I've created a new Quad and called it TravelatorMask - This quad will act like a window or portal to see the moving tiles underneath. To do this, in the hierarchy view click the Plus symbol -> 3D Object -> Quad. Remove its collider component as we won't be needing it. Move & resize the quad so it covers the area that you'd like to see through.
 The masking quad in position
Custom Transparent Shader Setup
The TravelatorMask will need to be completely invisible, but also needs to be rendered in the Opaque render queue to occlude the tiles beneath. I've created a simple shader to accomplish this:
Shader "Custom/TravelatorMask"
{

Properties{}

SubShader{

Tags {
 "RenderType" = "Opaque"
 }

 Pass{
 ZWrite Off
 }
 }
}
Shaders are just a script - create this as a plain text file and save it with the .shader file extension in your Assets -> Shaders folder in your project.
Once Unity has finished compiling your new shader, create a new Material - I've called mine TravelatorMask - and use the new Custom/TravelatorMask shader on the TravelatorMask material. Add this material to your TravelatorMask GameObject.
 The masking quad with it's custom transparent shader applied
Introducing the UniversalRenderPipelineAsset Renderer Features & Stencil Buffer
From here we are going to setup the URP renderer so that it only renders objects on the TravelatorTiles layer if objects are behind (occluded) by an object with a particular value in the Stencil buffer. This basically allows us to make an entire layer invisible to the player except when the object is viewed through another object, like the TravelatorMask.
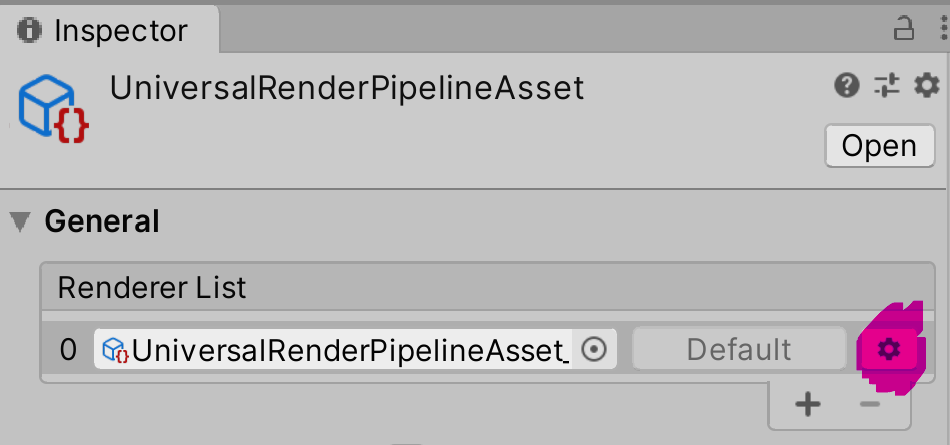
Click on your UniversalRenderPipelineAsset object in your hierarchy, and click the gear icon to the right of the UniversalRenderPipelineAsset_Renderer in the inspector:
 URP Asset
Click the + symbol to add a new Renderer Feature. I've called this render feature Travelator Tiles & set up this render feature to process after rendering transparents. The Layer Mask is set to Travelator tiles so that it only applies to objects in the TravelatorTiles layer. The Compare Function Equal checks the value already in the Stencil buffer - in this case if the value is equal to 5, the layer is rendered. If the value is not equal to 5 it is not rendered.
 Renderer Feature for our Travelator tiles with Stencil Buffer settings
Lastly, we need another Renderer Feature to override the Stencil buffer value assigned to objects in our Travelator Masks layer to be the same int we specified in our TravelatorTiles Renderer feature.
Click the + symbol to add a new Renderer Feature. I've called this render feature TravelatorMask & set up this render feature to process after rendering Opaques. This Renderer Feature always writes the int value 5 to the Stencil Buffer for any object on the TravelatorMasks layer.
 Renderer Feature for our Travelator Mask with Stencil Buffer settings
The last step is to change the Default Layer Mask of the Forward renderer to exclude (untick) the two layers you are using to create this effect. In my case TravelatorMasks layer and the TravelatorTiles layer
 Forward Renderer Default Layer Mask
Note: There is currently a bug in Unity that will cause the Prefab Preview window to be completely black if you do not have 'Everything' set in the Default Layer Mask pull-down list. Here's the bug report if you want to give it a vote: https://issuetracker.unity3d.com/issues/urp-prefab-preview-is-blank-when-a-custom-forward-renderer-data-and-default-layer-mask-is-mixed-are-used
That's it! Now that we've got both the renderer features setup, you can use this to create your own windows & portals! Note if this doesn't work for you initially, check the rotation of the object with the mask material applied to it - it needs to face the camera, and it only works from one side!
Stencil buffer in action
Example URP Project with Stencil Buffer window
I've created an example scene using the sample URP scene that unity creates when you first start using URP to demonstrate this technique. To use this example, first create a new project using the URP template:

Once it's loaded, download my example unity package
Drop the StencilExample.unitypackage into the assets folder of your project, and reload the scene when prompted.
Move the quad between the tools on the bench and the camera to see the stencil buffer window working
Reversing the Effect
You can reverse this effect (have the objects normally visible, but invisible behind the transparent window) by changing the logic in the stencil compare functions. To do this, change the HiddenObjects forward renderer object to instead Keep when the stencil value isn't 5 (the value we set the stencil in the StencilMask Shader)

Once that's done, modify the StencilMask ForwardRenderer object to instead Replace on Fail when the stencil buffer value is 5

Hide Shadows from Hidden Objects
One thing you may notice about this technique is that objects still cast shadows, even when hidden. This is because the object is still in the scene, and is still being lit by the lights in your scene. One method I've found to hide the shadows of your hidden objects is to duplicate the objects that the shadows are being cast on, and duplicate the lights. Using culling layers, you can setup your scene so only see the shadows cast by your hidden objects when viewed through your portal.
To illustrate this, I've updated my example scene. I've set the Paint Supplies objects to be hidden by changing it's layer to HiddenObjects.
I selected the Workshop Set GameObject, duplicated it & renamed the duplicate to Workshop Set - Hidden and also changed it's layer to the HiddenObjects layer.
I duplicated the spotlight in the Construction Light Low GameObject, and changed the duplicate's Culling Mask to include only the HiddenObjects layer:

Lastly, I set the culling mask for the original spotlight to everything other than the HiddenObjects layer:

Here's how the finished scene looks
The finished stencil effect with culled shadows effect
References
https://forum.unity.com/threads/stencil-buffer-for-uwp-if-so-how.805728/
https://forum.unity.com/threads/trying-to-get-a-mask-effect-with-stencil-buffer.510973/
https://answers.unity.com/questions/1660050/stencil-shader-no-longer-working-with-lightweight.html
https://prime31.github.io/stencil-buffer-occlusion/
https://cyangamedev.wordpress.com/2020/02/24/sprite-stencil-overlay-breakdown/
https://docs.unity3d.com/Manual/SL-CullAndDepth.html
https://forum.unity.com/threads/stencil-buffer-and-shadows.689884/